This blog post shows a quick example of implementing custom authentication in .NET Core 2.1 to secure your Web API. And in most cases you do want to secure your Web APIs, even though they were internal (micro)services only. If you don’t have a proper Identity provider e. g. Identity Server in place, and just need a quick solution, then a simple option is to validate Authorization header against a hardcoded value.
To illustrate such implementation, let’s create a new Web API project (I am using Visual Studio 2017), and test if the default GET endpoint created returns values correctly. I use Postman for RESTful API testing. The GET call should be successful.

Now let’s enable authentication on all MVC endpoints by using an authorization filter in ConfigureServices() method. This way all newly added endpoints will be secure by default, and other developers won’t forget to manually secure the endpoints they are adding.
services.AddMvc(options =>
{
    // All endpoints need authentication
    options.Filters.Add(new AuthorizeFilter(new AuthorizationPolicyBuilder().RequireAuthenticatedUser().Build()));
});
In Configure() method enable authentication capabilities.
// Enable authentication capabilities
app.UseAuthentication();
And then configure default authentication scheme and call an extension method for custom authentication that we are about to implement. Just add following in ConfigureServices() method.
// Add authentication
services.AddAuthentication(options =>
{
    options.DefaultAuthenticateScheme = CustomAuthOptions.DefaultScheme;
    options.DefaultChallengeScheme = CustomAuthOptions.DefaultScheme;
})
// Call custom authentication extension method
.AddCustomAuth(options =>
    {
    // Configure password for authentication
    options.AuthKey = "custom auth key";
});
The extension method is the key point to implementing the custom authentication handler. It adds a new authentication scheme with custom authentication handler and it’s options.
public static class AuthenticationBuilderExtensions
{
    // Custom authentication extension method
    public static AuthenticationBuilder AddCustomAuth(this AuthenticationBuilder builder, Action<CustomAuthOptions> configureOptions)
    {
        // Add custom authentication scheme with custom options and custom handler
        return builder.AddScheme<CustomAuthOptions, CustomAuthHandler>(CustomAuthOptions.DefaultScheme, configureOptions);
    }
}
And stubbing options and handler should allow to compile the code and run a quick test. Make sure handler’s stub returns “AuthenticateResult.Fail(“Not implemented”);” instead of throwing an exception :)

Now the same endpoint returns 401 unauthorized response code. This is the expected result, since we don’t have our custom authentication handler’s logic implemented.
So now we just need to implement the custom authentication handler. The logic should be very simple – compare Authorization header value against the one passed in the AddCustomAuth() with options.
protected override Task<AuthenticateResult> HandleAuthenticateAsync()
{
    // Get Authorization header value
    if(!Request.Headers.TryGetValue(HeaderNames.Authorization, out var authorization))
    {
        return Task.FromResult(AuthenticateResult.Fail("Cannot read authorization header."));
    }

    // The auth key from Authorization header check against the configured one
    if (authorization != Options.AuthKey)
    {
        return Task.FromResult(AuthenticateResult.Fail("Invalid auth key."));
    }

    // Create authenticated user
    var identities = new List<ClaimsIdentity> {new ClaimsIdentity("custom auth type")};
    var ticket = new AuthenticationTicket(new ClaimsPrincipal(identities), Options.Scheme);

    return Task.FromResult(AuthenticateResult.Success(ticket));
}
Now run the Web API project again, add Authorization header in Postman, and try to hit the GET endpoint.
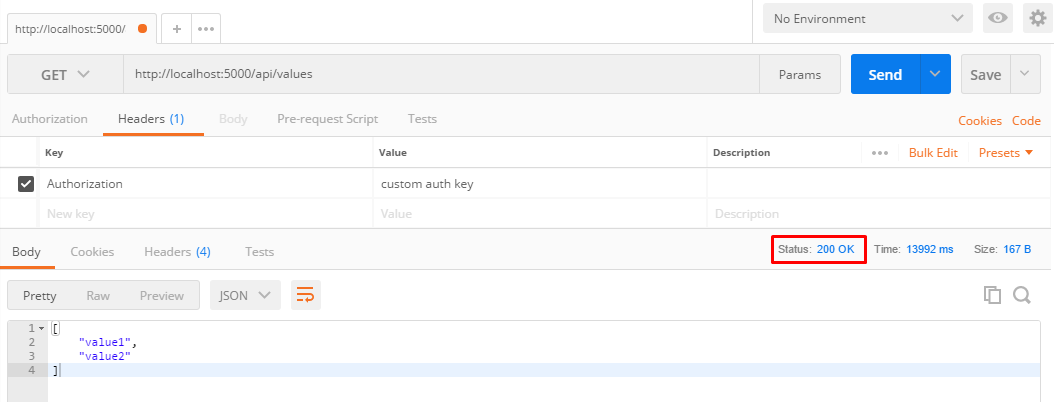
And if you removed the Authorization header, or used a different value, you would get 401 unauthorized response code again. All set!
Several hints and gotchas
- Change logging level to Information, so you would see what authentication is doing behind the scenes.
- Make sure ClaimsIdentity() returns an authenticated user, e.g. pass in an authentication type parameter.
- Make sure you use the same scheme name across the application, e.g. use a constant.
- If you have multiple endpoints and looking for an easier way to test them, try Swagger, an example of using it can be found here.
UPDATE (3rd December, 2017)
Per request on GitHub I’ve added multiple authentication keys support to the code example. I’ve used StringValues type for Options.AuthKey to keep the change backwards compatible, and to enable multiple authentication keys configuration. Therefore, both configuration examples provided below are valid now.
// Single Auth key
.AddCustomAuth(options =>
{
    options.AuthKey = "custom auth key";
});

// Multiple auth keys
.AddCustomAuth(options =>
{
    options.AuthKey = new[] { "custom auth key", "custom auth key2" };
});
Also, if multiple authorization headers are sent, all of them have to match the configured ones, i.e. if at least one key didn’t match, then 401 response will be returned.
Source code of the working custom authentication WebAPI is on my GitHub.
UPDATE (27th January, 2019)
Source code upgraded to .NET Core 2.1 (LTS release), no breaking changes.